Create your Outseta account
You can sign up for a 7-day free trial of Outseta here: https://www.outseta.com/get-started
Once you're in Outseta, you'll immediately see our setup guide. Complete steps 2, 3, and 4, and then come back here and continue on to installing Outseta on your site.
Install Outseta on your site
Add the Outseta script in the <head> of your site
Go to Auth > Embeds in Outseta and copy the <head> script. In Webflow, go to Project settings > Custom code and paste it in.
Embed sign up, log in, logout, and profile
Also in Auth > Embeds in Outseta you can grab pop-up links for Sign up, login, profile, and logout. These links are already preconfigured to display when appropriate—if the user is logged in the sign up/login links will be hidden, and the profile/logout links will be shown, etc.
For more configuration options, and to place embeds directly on a page (instead of a pop-up), go to the individual tabs for each embed type.
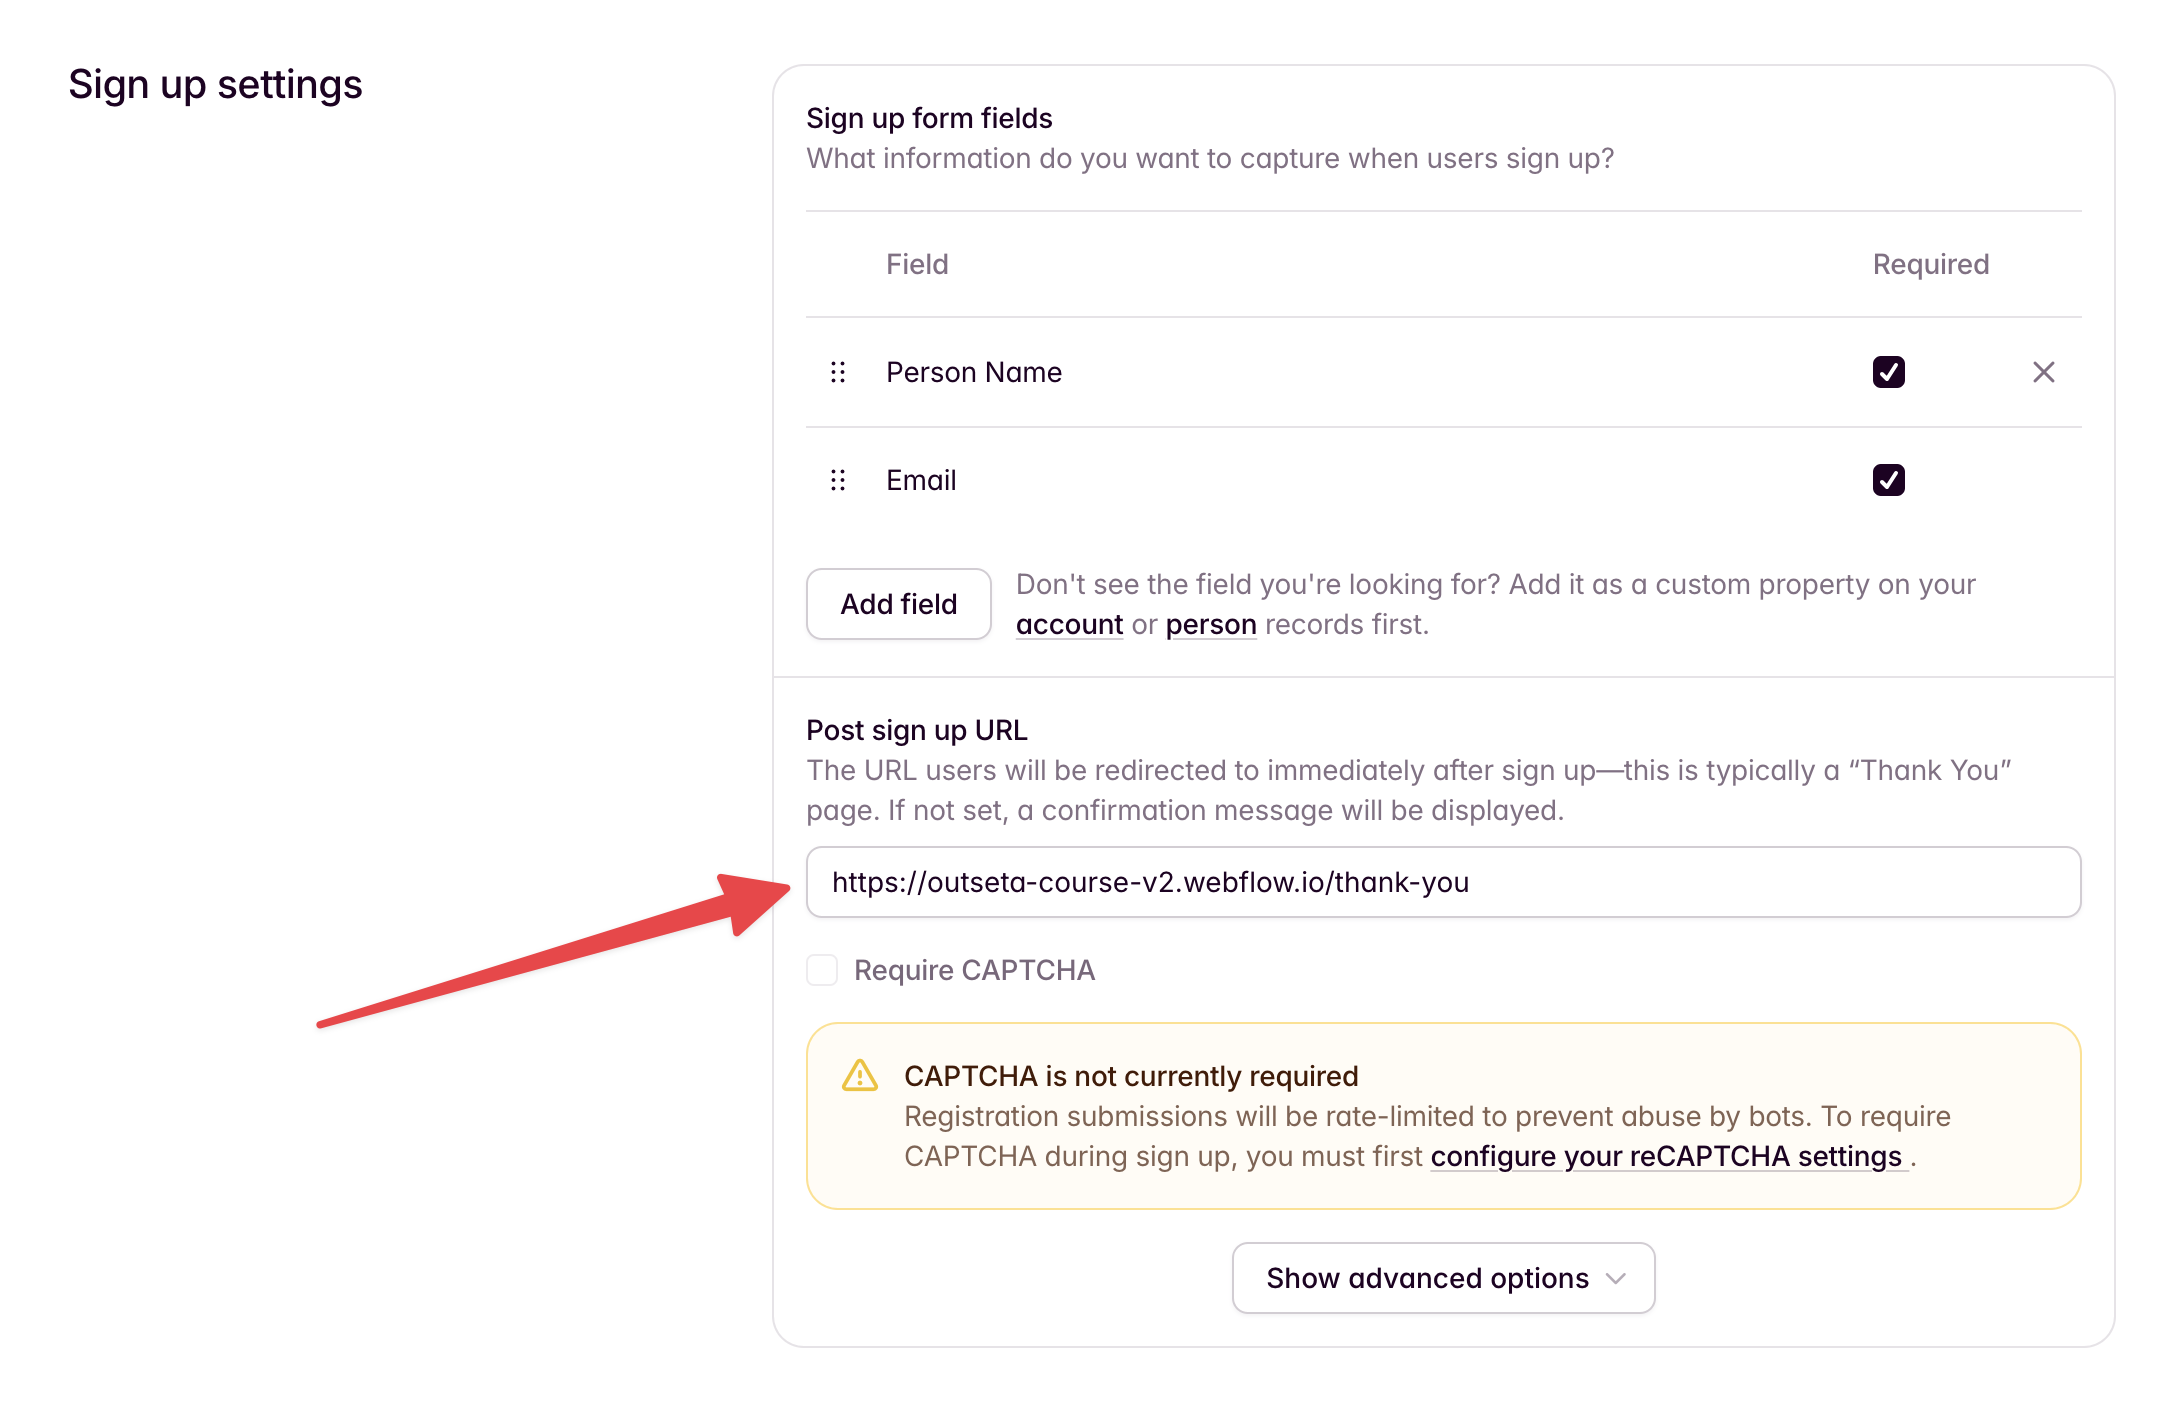
Set your Post Login URL and Post Sign Up URL
Go to Auth > Embeds within Outseta. Set your Post login URL to something like "https://yourwebsite.com/dashboard", which is the page where users will land when they log in.

Set your Post sign up URL to the "Thank you" page. This is where users will be redirected immediately after they sign up. The "Thank you" page is typically a page that let's the user know they need to check their email to verify their account and login.
Add custom properties
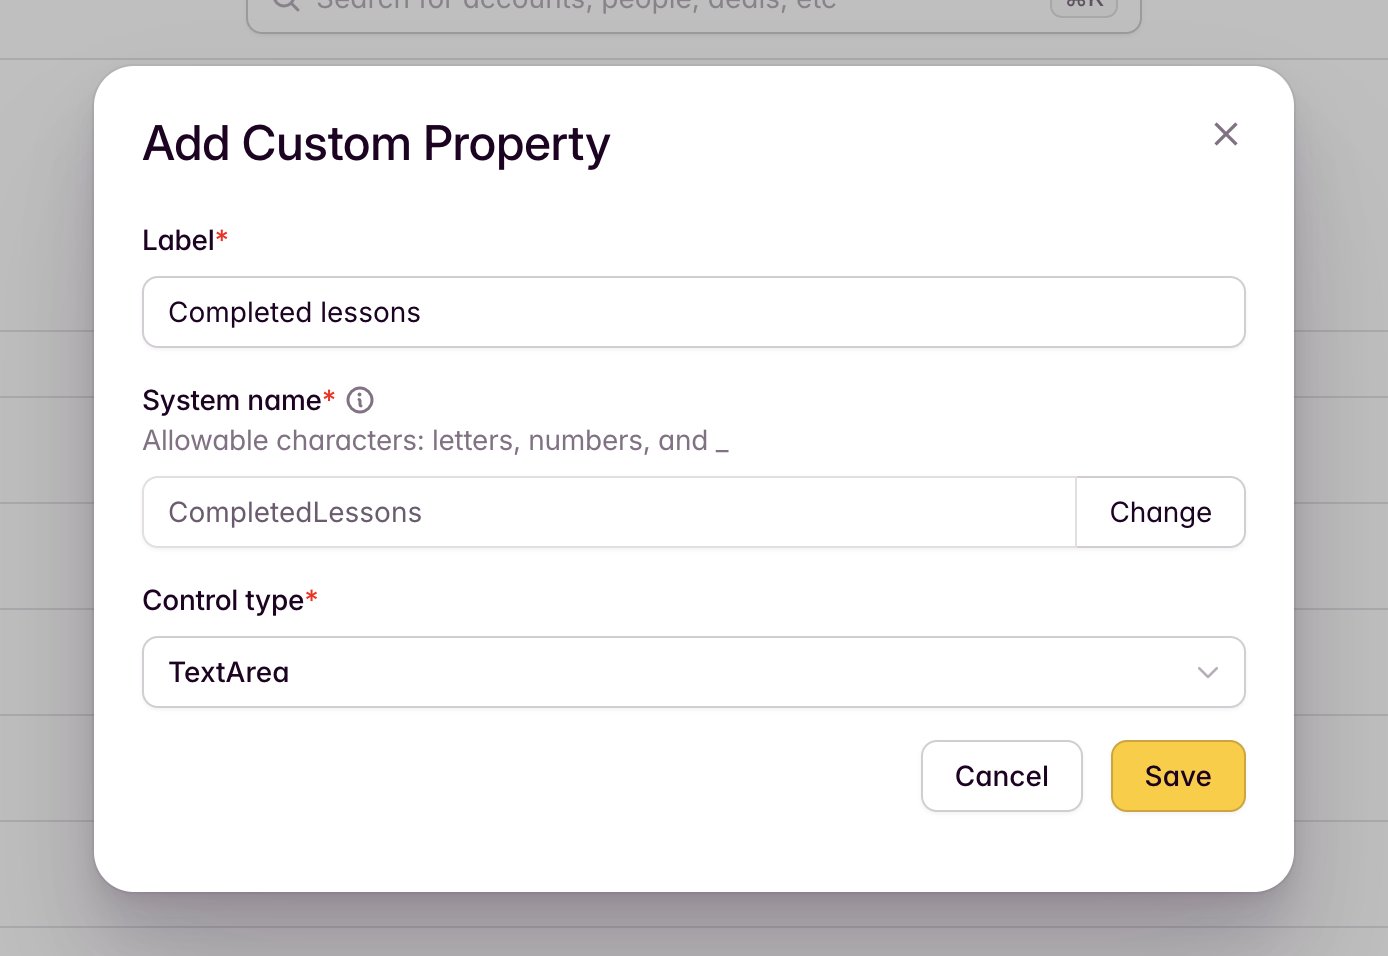
Add a custom property that will store completed lessons
In Outseta, go to CRM > Custom properties and go to the Person tab. Add a property and name it "Completed lessons". Change the "Control type" to textarea.
Set up teaser content
Providing free content is a great way to showcase your teaching style and give prospective students a sense of what they’ll get before they commit to buying. In your Lessons CMS collection, include a switch field called something like “Is free?”. This is how you'll choose which lessons are teasers and can be viewed for free.
On the Lessons CMS collection page, in the list of lessons, include some indicator that some lessons are paid and some are free. In this template, we've opted to display a lock icon for paid lessons. On that indicator element (i.e. the lock icon) set the conditional visibility to "Is free? is off", and add the following custom attribute:
data-o-anonymous = "1"
This will ensure that only paid lessons display the indicator, and that only anonymous users (i.e. users who are not logged in) will see it.
Protect paid content
For any lesson where “Is free?” is not enabled, you'll want the lesson content to be protected. Users who don’t have access won't be able to view it.
Set up the paywall element
If someone who is not logged in navigates to a paid lesson, they should be presented with a call to action that encourages them to sign up to get access. In this template we've opted to display a blurred image of a video player with a CTA overlaid on top. On that paywall element (i.e. the blurred video), just like in the last step, set the conditional visibility to "Is free? is off" and add the following custom attribute:
data-o-anonymous = "1"
Again, this will ensure that only paid lessons display the paywall element, and that only anonymous users (i.e. users who are not logged in) will see it.
Set up protected content
For any content (video player, text, anything) that you want to be protected and only visible to logged in users, add the following custom attribute:
data-o-authenticated = "1"
Set up course-specific features
The Course solution enables you to track lesson completion, display progress indicators, auto-complete lessons on video finish, and automatically redirect users to their current lesson.
Add script to your lesson page
Add this <script> inside the <head> tag of your Lessons CMS collection page:
<script async type="module"
  src="https://cdn.jsdelivr.net/npm/@outseta/attributes@latest/dist/core.js"
  o-course
></script>
Note: This script requires Outseta to be installed on your site. The user must be logged in for completion tracking to work.
Add attributes to your lesson page elements
Define a lesson wrapper
Wrap your lesson content in an element with the following attributes.
data-o-course-element = "lesson"
data-o-course-lessonid = "IDENTIFIER"
The identifier should be bound to a CMS item field—the Slug is generally the best CMS item field to use, since it's both unique and human-readable. This value is what will get added to the custom Completed lessons property you created in Outseta.
Example:
<div data-o-course-element="lesson"
  data-o-course-lessonid="lesson-1">
  <!-- Lesson content here -->
</div>
Set the "Completed lessons" property (optional)
By default, completed lessons are stored in the "CompletedLessons" property on the Outseta user object as a JSON array of lesson IDs. You can customize this:
data-o-course-completed = "PROPERTY"
Example:
Below, the completed lessons will be saved to the CompletedStuff property in Outseta instead of CompletedLessons.
<div data-o-course-element="lesson"
  data-o-course-lessonid="lesson-1"
  data-o-course-completed="CompletedStuff">
  <!-- Lesson content here -->
</div>
Define a mark complete button
Add this attribute to a button that marks the lesson as complete.
data-o-course-element = "mark-complete"
Define an unmark complete button
Add this attribute to a button that unmarks the lesson as complete.
data-o-course-element = "unmark-complete"
Example:
<div data-o-course-element="lesson"
  data-o-course-lessonid="lesson-1">
  <button data-o-course-element="mark-complete">
    Mark as Complete
  </button>
  <button data-o-course-element="unmark-complete">
    Completed
  </button>
</div>
Note: These buttons are hidden by default and will be shown/hidden based on the lesson's completion state.
Define a lesson list item (for complete indicators)
To display completion status indicators in a lesson list (e.g., sidebar navigation), add these attributes to the CMS collection list item. For the identifier, bind to the same CMS field you used for the lesson wrapper (we recommend the Slug).
data-o-course-element = "lesson-list-item"
data-o-course-lessonid = "IDENTIFIER"
Define a lesson complete indicator
Add this attribute to an element (perhaps a checkmark icon) inside the lesson list item wrapper. This will be shown when the lesson is completed.
data-o-course-element = "lesson-list-item-complete"
Define a lesson incomplete indicator (optional)
Add this attribute to an element inside the lesson list item wrapper. This will be shown when the lesson is not completed.
data-o-course-element = "lesson-list-item-incomplete"
Example:
<div data-o-course-element="lesson-list-item">
  <a href="/lessons/lesson-1">Introduction</a>
  <div data-o-course-element="lesson-list-item-incomplete">
    <!-- Incomplete indicator -->
  </div>
  <div data-o-course-element="lesson-list-item-complete">
    <!-- Complete indicator -->
  </div>
</div>
Note: The indicators are hidden by default and toggle visibility based on completion status.
Define a next lesson link (optional)
To show a link to the next lesson after the current lesson is marked complete, add the following attribute to an element.
data-o-course-element = "next-lesson-link"
Example:
<div data-o-course-element="lesson">
  <a href="/lessons/lesson-2" data-o-course-element="next-lesson-link">
    Next lesson
  </a>
</div>
Note: The element starts hidden (opacity: 0, pointer-events: none) and becomes visible when the lesson is marked complete.
Mark as complete based on video playback (optional)
To automatically mark a lesson as complete when the user finishes watching a video, add the following attribute to an element that wraps the video.
data-o-course-autocompletevideo = "true"
Supported video platforms:
- YouTube (including Embedly, used by Webflow)
- Vimeo (including Embedly, used by Webflow)
- HTML5
<video>elements
Example:
<div data-o-course-element="lesson">
  <div data-o-course-autocompletevideo="true">
    <iframe src="https://www.youtube.com/embed/VIDEO_ID"></iframe>
  </div>
</div>
Note: The lesson is marked complete when the video reaches within 10 seconds of the end.
Add script to your post-login page
Add this <script> inside the <head> tag of your Post-login page (the page you've set in Outseta as your post-login URL):
<script async type="module"
  src="https://cdn.jsdelivr.net/npm/@outseta/attributes@latest/dist/core.js"
  o-course
  o-list
></script>
Note: This script requires Outseta to be installed on your site. The user must be logged in for completion tracking to work.
Add attributes to your post-login page elements
Define a lesson list to filter
To filter a lesson list to show the first incomplete lesson, add these attributes to a CMS collection list element:
data-o-list-element = "list"
data-o-list-property = "CompletedLessons"
data-o-list-filter = "exclude"
data-o-list-limit = "1"
Note: Make sure that this lessons CMS collection list is sorted from first to last lesson.
Example:
<div data-o-list-element="list"
  data-o-list-property="CompletedLessons"
  data-o-list-filter="exclude"
  data-o-list-limit="1">
  <!-- CMS collection items -->
</div>
Define a lesson list item
Add this attribute to the CMS collection list item. For the identifier, bind to the same CMS field you used for lesson items on your lesson CMS page (we recommend the Slug).
data-o-list-itemid = "IDENTIFIER"
Example:
<div data-o-list-element="list"
  data-o-list-property="CompletedLessons"
  data-o-list-filter="exclude"
  data-o-list-limit="1">

  <!-- CMS collection item -->
  <div data-o-list-itemid="lesson-1">
    <a href="/lessons/lesson-1">
      Lesson 1
    </a>
  </div>

  <!-- CMS collection item -->
  <div data-o-list-itemid="lesson-2">
    <a href="/lessons/lesson-2">
      Lesson 2
    </a>
  </div>

  <!-- CMS collection item -->
  <div data-o-list-itemid="lesson-3">
    <a href="/lessons/lesson-3">
      Lesson 3
    </a>
  </div>

</div>
Define a link for the automatic redirect (optional)
To redirect users to their first incomplete lesson automatically, add this attribute to an <a> element or wrapper that contains the <a> element. This can be the same element as the lesson list item.
data-o-course-element = "redirect"
Example:
<div data-o-list-element="list"
  data-o-list-property="CompletedLessons"
  data-o-list-filter="exclude"
  data-o-list-limit="1">

  <!-- CMS collection item -->
  <div data-o-list-itemid="lesson-1"
    data-o-course-element="redirect">
    <a href="/lessons/lesson-1">
      Lesson 1
    </a>
  </div>

  <!-- CMS collection item -->
  <div data-o-list-itemid="lesson-2"
    data-o-course-element="redirect">
    <a href="/lessons/lesson-2">
      Lesson 2
    </a>
  </div>

  <!-- CMS collection item -->
  <div data-o-list-itemid="lesson-3"
    data-o-course-element="redirect">
    <a href="/lessons/lesson-3">
      Lesson 3
    </a>
  </div>

</div>
Behavior
- Redirects to the
hrefof the first visible<a>tag within the element (or the element itself if it's an<a>tag) - Only redirects once per session, so if using the post-login page as a dashboard page, they'll be able to go back to this page without being redirected again.